How to highlight text In Illustrator
The designers use this software to create graphics. There are many options in this tool and we create many things using this tool.
There is a problem that most people have, which is that they can’t highlight the text. Text is essential for graphics.
There are no options for emphasizing the text, so we have to manually underline the text. To create anything, a highlight is essential. Most of the time, we don’t highlight graphics we create without highlighting them.
There are many options to create this content but we follow the easiest method. The method we follow uses the rectangle shape.
In this blog post, we guide you on how we create highlight text in Adobe Illustrator.
We take the screenshots from Adobe Illustrator CC. If you are using Mac, some options may be different but the method is the same and you are able to create on your Mac.

Step 1
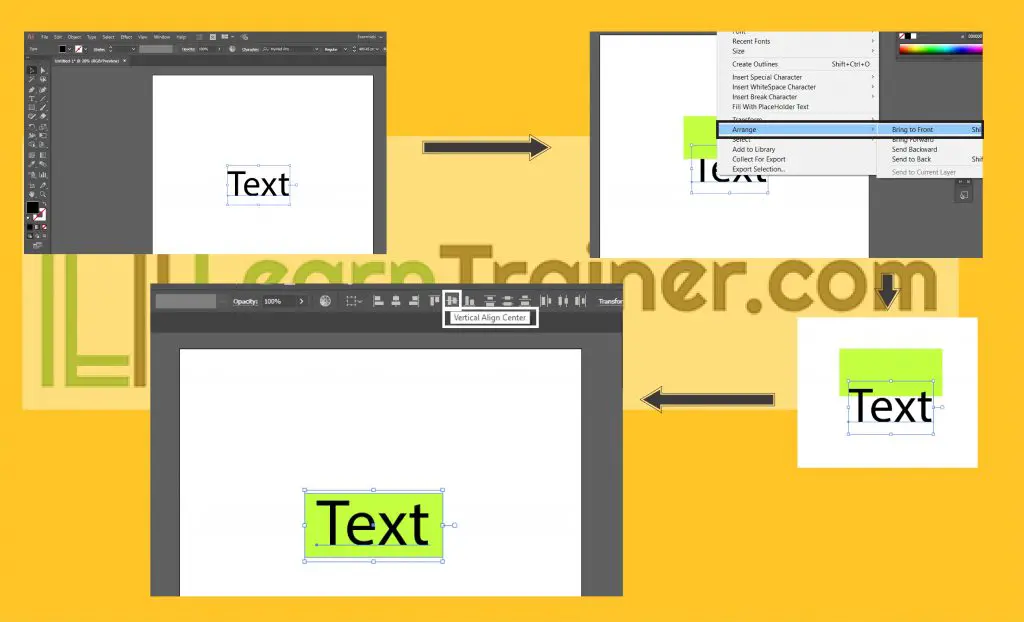
The designer needs to open the software and then press (Ctrl N) for the newly created artboard. When a brand-new artboard is designed, we need to write any text to point up to it.
Step 2
We must create a rectangle box enclosing our text after we have written it. We choose the color of the rectangle according to our needs. The box rectangle we create using the shape tool in the sidebar.
Step 3
We write text and create an empty box. Now we need to select the text we have written and right-click them.
As soon as we right-click the text, the large box is open and there are many options and we will have to choose the (Arrange) option.
After pressing (Arrange), select the (Bring to Front) button after pressing (Arrange) to open another box with four options. When we push the (Bring to Front) button, we see that the text has come on the upper side.
Step 4
When our text is on the upper side and the box is reversing the font. We need to align the text. We select both text and rectangle and then we align the text. The alignment option is seen on the upper side when we select both things and we click the (Vertical align) option.
We see that our text is now aligned and we use four steps to create this thing. We provide you with a step by step guide to help you create your graphics in high quality.


