How to Italicize Text In Illustrator
Adobe Illustrator is the software for creating graphics. Designers should use the software. Using the software, people create logos, business cards, letterheads, flyers, brochures, and much more.
Typography and fonts are very significant in designing. Most people have one issue, and that is they don’t italicize the text. As a designer, you must know how to italicize since every graphic uses italic fonts.
The issue we resolve in this article. We give you steps and you need to follow them. We share two methods to complete this work and both methods are very easy.
There is only one thing people need to know, and that is basic knowledge about software.
We capture screenshots from Adobe Illustrator CC in Windows. On a Mac, you also follow the same steps. Both Windows and Mac have the same process.

First Method
Step 1
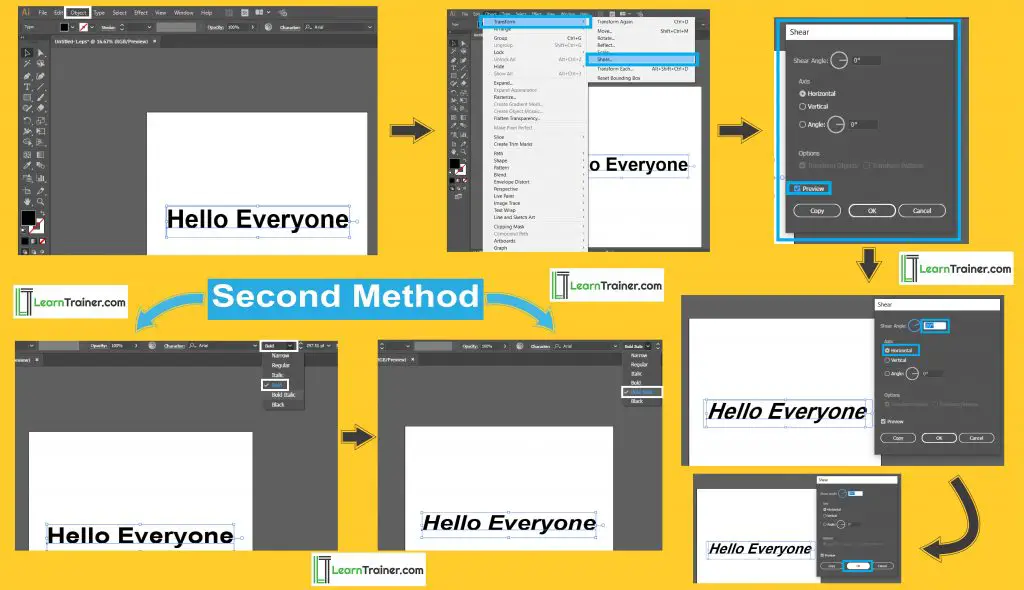
First of all, we need to create the text. When we write the text, we see the upper side of the object is written.
Step 2: When we click on an object, we see many options. The option we need is (Transform). This will help us to create the text in italic.
Step 3
When we press the (Transform) button, we are given five options. We select the (Shear). When we click on them, we see below that a box is opened. We click on (Preview) to preview the work in our text.
Step 4
After that, we click (horizontally) and expand the (Shear angle) size. Depending on our needs, we increase the size.
We increase the size and then we see the results. When we change the font size, we click the OK button.
We completed the first method and you can easily change the font style using it, but here is the second one.
The next method is also easy.
Second Method
Step 1
In this step, we need to write any text. When we write the text, the upper side option is given. In this option, we see that Bold is displayed and it is based on your font.
If you choose the bold typeface, the bold upper side is shown. If the font has bold, regular, or thin options, the upper side is the option given.
Step 2
Now we click the option and we see that there are many options available. When we select (Bold Italic), our font is changed to bold italic.
If the font offers italics, the upper side will be italicized. However, if the font does not offer this option then that means the font does not provide italics.
Hopefully, you will be able to solve your problem by using both methods. We will provide instructions and cover all the things needed to complete the style.


